Installation
Overview
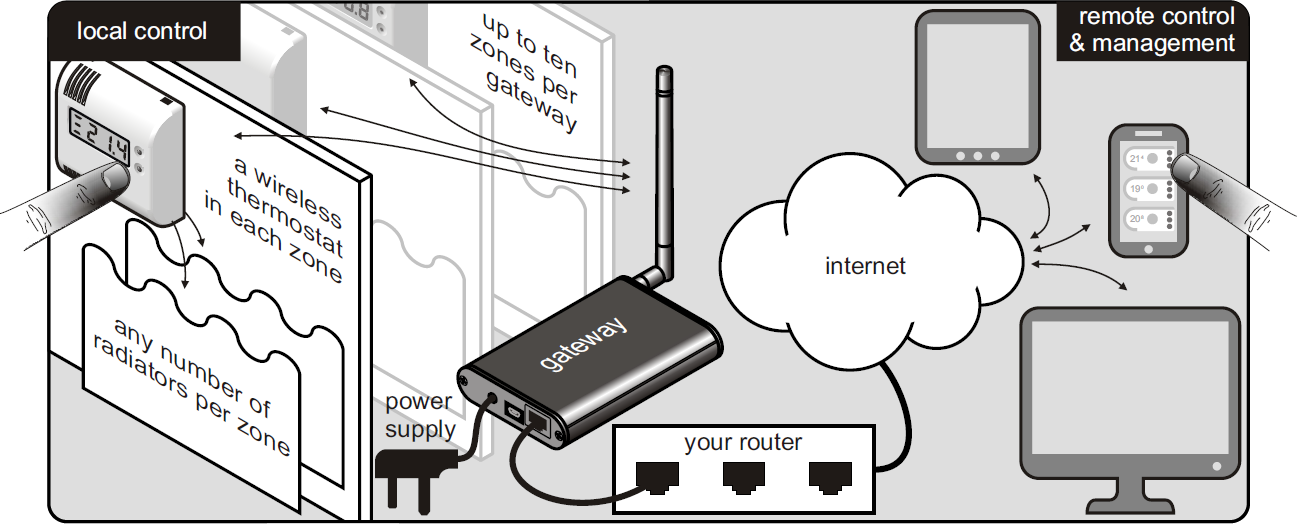
Follow the steps below to install your system.
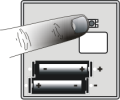
1 Remove thermostat back plate
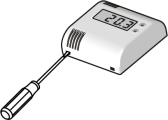
To change batteries or remove your thermostat from the wall, push a screwdriver into the two recessed holes at the bottom to release the back plate. If the back plate was fitted upside down you may find the recessed holes on top.
2 Insert thermostat batteries
Insert 2 new high quality AAA alkaline batteries. Do not refit the backplate yet.
WARNING
The manufacturer is not responsible for damage due to corrosion.
Battery leakage will cause permanent damage.
To help avoid this:
- Replace the batteries annually, even if there is not a low battery warning. Remove failing or flat batteries immediately.
- Always fit a pair of new high quality alkaline batteries from the same pack. Never mix new and old batteries or batteries of different brands or types.
- Never attempt to revive alkaline batteries by heating, crushing or recharging.
3 Pair radiator with thermostat
You must make a wireless connection between your radiator and your thermostat.
-
With the knob on (turned clockwise),
switch the radiator's mains supply off.
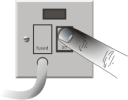
- Now, timing is critical: switch it on for three seconds then off again.
You can say,
"On, one thousand, two thousand, three thousand, off".
- Switch it back on.
The light
on the radiator
should be flashing; if it is not flashing restart the procedure.
- You now have half a minute to press the button on the back of the thermostat.
Once pressed, the light on the radiator will
immediately stop flashing
and possibly change colour depending on the settings
and the room temperature.
Now that it is paired you shouldn't ever have to do it again, though you may also wish to follow this procedure if you add more radiators or move your radiator to another thermostat.
4 Getting online
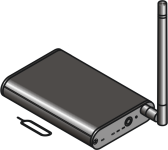
Plug the power cable into the gateway and fit its antenna pointing upwards. Connect your gateway to your router using the network cable.
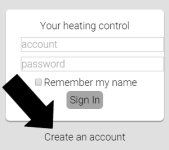
With any browser go to app.radiwarm.com/ then click on "Create an account" and follow the instructions. Or if you already have an account you use "Add Gateway" on the iAccount menu.
5 Pair thermostat with gateway and test system
It is best to do this when you are online. Just find the System setup screen, click "Add thermostat" and follow the instructions. Go to the "System setup" from the iMenu menu, click "Add thermostat" and follow the instructions. From this screen you can give your gateway and each thermostat a name. Check that the system works by switching radiators on and off from the app.
If you are not online you can pair the thermostat and gateway by pressing PAIR on the gateway with the supplied pin then pressing the button on the back of the thermostat. To test the system press and hold PAIR, and while it is pressed, press MODE. L3 starts to flash red. All thermostats are on full-power for a period of 10 minutes or until you cancel the test by pressing MODE.
6 Choose thermostat position
Position on the wall in the same room as the radiator. It should be where its temperature will not be changed by local effects. Avoid:
- Draughty places near windows, doors and vents.
- Places near the radiator itself or any other heat sources in the room.
- Places where the sun will shine on it.
- Places where, for example, it could be hit by a door.
- Places where it may get wet.
The maximum wireless connection distance from a thermostat to a radiator or to a gateway depends on the surrounding objects and the building. It can be up to 30 meters in some installations.
Before permanently fixing it, hold the thermostat in the chosen position and adjust it to make your radiator turn on. If it does not turn on, consider a different position.
7 Fix thermostat to the wall

Mark through the screw holes on the rear.
Drill and plug the wall to accept two No. 6 screws and mount the wall plate
with the clips at the bottom.
Clip the thermostat back onto the wall plate.
Your wireless thermostat
Models
 Model CTH1 has no buttons or display for where occupants
do not need to make adjustments.
Model CTH1 has no buttons or display for where occupants
do not need to make adjustments.
 Model CTH3 has a display and buttons so the occupant can see and adjust
the temperature.
Model CTH3 has a display and buttons so the occupant can see and adjust
the temperature.
What it can do
Your thermostat gives precision control of the zone temperature. Being battery powered, it is completely wireless. Once set up, it will keep to its 7 day schedule even if the gateway is switched off.
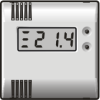
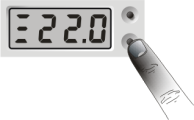 The thermostat normally shows the measured temperature.
When you press a button it flashes the set temperature.
Press a button while it is flashing to adjust the set temperature
between 4°C and 30°C or --.- for no heating.
Sometimes you are not permitted to adjust depending on app overrides.
Your adjustment usually starts a temporary override of the normal
scheduled temperature, depending on how it was set up from the app.
The thermostat normally shows the measured temperature.
When you press a button it flashes the set temperature.
Press a button while it is flashing to adjust the set temperature
between 4°C and 30°C or --.- for no heating.
Sometimes you are not permitted to adjust depending on app overrides.
Your adjustment usually starts a temporary override of the normal
scheduled temperature, depending on how it was set up from the app.
The left hand dot flashes while there is a temporary override. You can cancel the override by pressing both buttons at the same time.

The bars on the left show the radiator's current power.

Your radiator
The radiator has an indicator light which may be:
- green
- when no heat is needed
- yellow
- when some heat is needed to maintain the room temperature
- red
- when it is on at full power
The light is normally on continuously, but may wink off or flash as described below.
The thermostat sends a radio signal. When the radiator receives the signal, the light winks off briefly and may change colour.
When the radiator is on, the light is always green until the first signal.
A slow flashing green light means that the radiator has not
received a radio signal for at least 5 minutes.
Follow the installation steps to fix this.
![]()
An alternating red-green flashing means that your radiator has over heated. Switch the mains supply off and allow it to cool. If the problem persists, your radiator may be faulty.
Reverting to manual control
If for any reason you want to use radiator without the thermostat, you can revert it to Manual Control:
- With the knob on (fully clockwise), switch the radiator’s mains supply off.
- Switch the mains on for three seconds then off again. Repeat this 5 times and your radiator will be back to manual control.
Your gateway

Normally the "Power on" and L1 lights are green.
Pressing MODE changes from L1 to L2 flashing green which means all thermostats
are overridden to frost protection 4°C.
L3 red means some system override temperature other than 4°C has been
selected from the app.
Pressing MODE again cancels any system override.
PAIR is pressed with the supplied pin during system setup
WebApp
How do I make a short-cut to this web app on my home-screen?
PC or laptop
Drag the icon at the left of the address bar of your browser to your desktop.
Android (Samsung/HTC/LG/Motorola)
Open the web app with Google Chrome. At the top right hand of Chrome there is a menu (3 vertical dots). Click on the menu and scroll down until you see "Add to home screen". You should then be able to give the link a name. The short-cut is now on your home screen.
Apple iPhone
Open the web app with Safari. At the bottom there should be a square with a arrow coming out of it. Click this and you will see a few buttons appear. Click on "Add to Home Screen" and give it a name. The short-cut is now on your last screen.
Windows Phone
Open the web app with the internet browser. At the bottom right corner there will be a menu, "...". Click on the menu and scroll down until you see "Pin to Start" and click on it. The short-cut is now on the bottom of your home screen.
Can I temporarily override scheduled temperature?
Yes, you can change the target temperature without having to change the schedule. Click on the set temperature and a dial will appear. Adjust it by dragging it then click OK. The override will last until the next scheduled temperature or until you click X.
Editing a schedule
You can view or edit the 7-day schedule of a thermostat by clicking its edit button. iEdit
The schedule is shown as a set of coloured bars. The colours and positions of the bars gives you an overview of the week. You can click on a step to see its start time and temperature in the panel at the bottom.
To adjust the selected start time click the time and you will be able to adjust the hours and minutes. Alternatively drag coloured bars left or right. Dragging is easier if you are using device with a large screen or mouse.
To adjust the selected temperature, click on the temperature circle. Alternatively if you have mouse you can use the mouse wheel.
iAdd adds a new step. You can have up to 6 per day.
iRemove removes the selected step. You can use the Delete key on a device with a keyboard.
iPrev and iNext select the previous or next step. You can use the arrow keys on a device with a keyboard.
iMenu menu gives you
- Copy day: for example to copy Monday to the other weekdays.
- Load schedule: from another thermostat, a schedule you have saved or one of our examples.
- Save schedule: so you can restore later.
Answer not here? Contact us.
RadiWarm
We're very happy to talk to you if you have any questions about your
purchase.
Our friendly team are available 9-5 Monday to Friday.
01422 231943
info@radiwarm.com
https://radiwarm.com